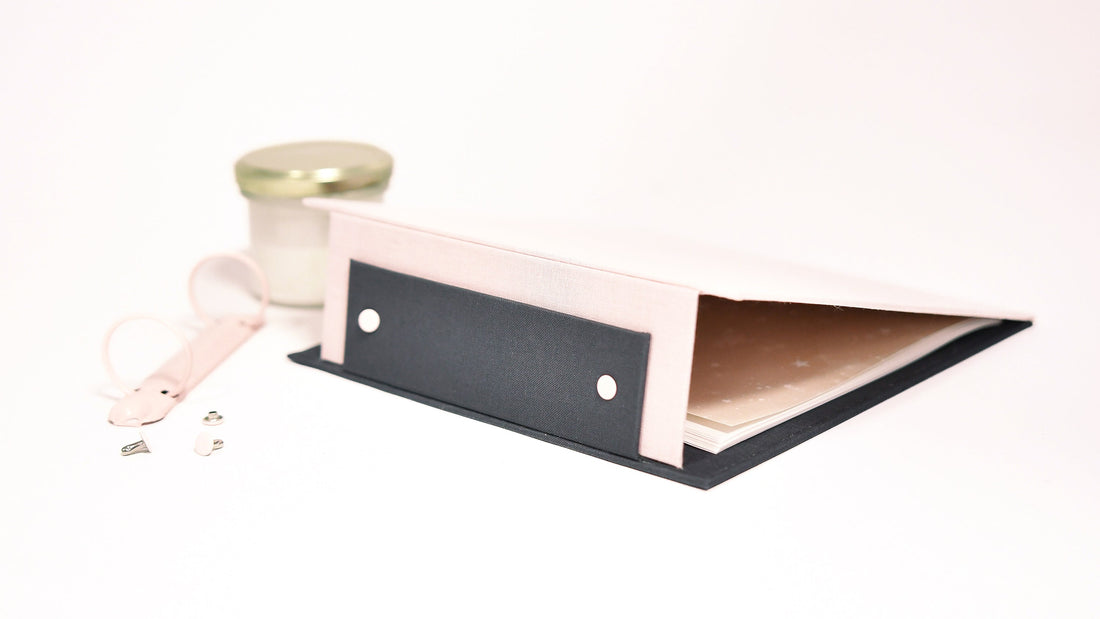
Today we'll show you how you can bind an elegant book with a double spine using our ring binder mechanisms. The two-tone spine creates an extraordinary book that you can fill with the most beautiful ideas to your heart's content.
What do you need for this?
Material:
-
Back part 1: 14 x 4 cm
-
Back part 2: 17 x 5.5 cm
-
Lid: 20 x 21 cm
-
Base: 20 x 21.3 cm
2 different colored book cloths
-
Book cloth 1:
-
Back part 1: 17 x 11.5 cm // 13.4 x 9.7 cm
-
Base: 23 x 24.3 cm // 19.4 x 20.7 cm
-
-
Book cloth 2:
-
Back part 2: 20 x 13 cm // 16.4 x 11.2 cm
-
Lid: 23 x 24 cm // 19.4 x 20.4 cm
-
Ring binder mechanism with rivets
Tool:
-
Bone Folder
-
Book glue ( Planatol book glue BB )
-
Paint brush
-
foam roller
-
-
hammer
-
Scrap paper
-
cutting mat
-
Small pieces of felt
Optional:
-
Small wooden board
-
pressure roller


Step 1: Measure and cut the gray cardboard
When cutting the gray cardboard, it is very important to work precisely in order to get a nice and clean result.
For cutting we recommend to use a drawing triangle with a cutting edge for assistance.
Tip: Using the measuring units and angles indicated on the drawing triangle makes it easier to measure the gray cardboard and bookcloth percisely. The steel edge prevents the cutter from accidentally cutting into the triangle itself and thus ensures a clean cutting edge.
Start by cutting the two gray cardboard pieces for the double spine.
First, cut a piece of gray cardboard measuring 14 x 4 cm.
To do this, first draw guidelines on the gray cardboard using the set square and a pencil.
Now cut out the gray cardboard part using a cutter along the guidelines drawn.
Go over the cutting line several times with the cutter. It is better to do this several times with a little less pressure than once with strong pressure, this prevents the gray cardboard from slipping.


Tip : If possible, always place the drawing triangle on the side of the gray cardboard with the larger area when cutting. This means that the drawing triangle has more grip on the surface and does not slip when cutting.
Cut the remaining gray cardboard to another back piece measuring 17 x 5.5 cm using the same procedure.
For the cover of the book you need gray cardboard measuring 20 x 21 cm and for the bottom you need a piece of cardboard measuring 20 x 21.3 cm.

Step 2: Cut the book cloth to fit
As with cutting the gray cardboard, precise work when cutting the book cloth is just as important.
Tip: For beginners, we recommend using paper-coated bookcloth. This can be glued easier and cleaner thanks to the coating.
To cut the spine, you will need slightly longer strips of book linen.
Decide on the colors of the lid and base.
Place a cut of gray cardboard for the spine on the book cloth. Here, measure a distance of the width of a ruler (or 1.5 cm) from the edges of the gray cardboard on the left, top and bottom and mark this with the help of the pencil.
Leave a space of approx. 6 cm to the right. At the end, this piece of book cloth is glued to the gray cardboard of the cover and base and serves as a joint.
Also draw guidelines on the linen along the edges of the gray cardboard. Cut out the book cloth with a cutter or rotary cutter .
Do the same with the second back cut. Pay attention to the colors of the book that you have specified for the cover and bottom of the book.
The larger back piece (17 x 5.5 cm) must be covered with the same linen as the lid. The smaller spine piece (14 x 4 cm) has the same bookcloth as the bottom of the book.
With a distance of 1.5 cm, you need a bookcloth cut measuring 20 x 13 cm for the larger spine piece and measuring 17 x 11.5 cm for the smaller piece.


Then cut the bookcloth to size for the cover and bottom of the book. You also have to remember to cut the bookcloth all around at a distance from the gray cardboard edge.
Place the gray cardboard cutout on the book cloth and use a pencil to trace the size of the gray cardboard. From here, measure the distance the book cloth should protrude at the end.
For simplicity's sake, we used a ruler width again here.
You can also measure a distance of 1.5 cm all around on all sides.
To help you, also mark the distance to the edge of the gray cardboard with a pencil.
Now cut the book cloth to size using a cutter or rotary cutter and the drawing triangle.
With a distance of 1.5 cm, you need a blank measuring 23 x 24.3 cm for the base and 23 x 24 cm for the lid.

Step 3: Cover gray cardboard with bookcloth
For gluing we recommend using Planatol book glue BB .
Dilute the book glue with a splash of water, but make sure that the glue does not become too thin.

Tip: Use some scratch paper as a separate base for gluing.
After gluing, you can quickly remove this from your craft base so you always have a glue-free base.
Take the gray cardboard and bookcloth cuttings to hand. It's best to start with the spine of the book.
Place the gray cardboard cutout on your separate base and glue it with the book glue.
Make sure the book glue is evenly distributed. Ideally, the glue can be distributed with a foam roller. Now place the blank on the corresponding bookcloth blank.
To do this, use the guide lines drawn for orientation. Turn everything over once and smooth out the book cloth and make it firm.
You can also use a pressure roller and run it over the linen several times.
Turn everything over again. Now cut off the excess bookcloth on the right two corners at a distance of 2 mm from the corner of the cardboard. To do this, place the drawing triangle diagonally to the corner. The distance must be the same as the material thickness of the gray cardboard. This small overhang will give you a nice, clean corner later.

Now the edges of the gray cardboard are glued to the excess bookcloth.
Start here on the right side. Glue the excess linen.
If too much glue has collected on the edge of the gray cardboard, you can use a brush to pick it up and remove it.


Then fold the linen up towards the gray cardboard. Use a folder to help you and run it along the edge of the cardboard.
To ensure you get a nice, clean corner, use the bone folder to fold the protruding book cloth around the edge of the cardboard and press everything firmly into place. Smooth it over with the bone folder.
You can remove any glue that comes out straight away. Always brush the linen towards the gray cardboard so that no glue residue gets onto the book linen.
Also make sure that the linen is folded in the corners. Trace the corners neatly with the bone folder.


Attention : On the back pieces, the side that is 6 cm longer must not be folded over.
Glue the linen that protrudes above and below and fold it over along the entire width. Use the bone folder to trace all edges cleanly.


Tip: If the glue gets on the book cloth while working, you can remove it from the book cloth with an adhesive eraser .
Do the same for the bottom and cover of the book. All 4 pages are included here. To do this, start on one side. Glue the gray cardboard cut-out and place the glued page in the middle of the book cloth.
To do this, use the help lines shown again. Now cut off the excess bookcloth at all corners with a distance of approx. 2 mm from the corner of the cardboard. Glue one of the protruding sides and fold it around the edge of the gray cardboard, as with the back pieces.
When bookbinding, opposite pages are always processed, so do the same with the opposite page. Then glue the remaining excess linen onto the other sides in the same way.
For all covered parts, make sure that they are weighed down after gluing until everything is dry. This means the gray cardboard cannot curl.

Step 4: Cover the inside of the back pieces
Now cut more pieces of bookcloth for the spine pieces.
These are used to cover the inside pages, where the gray cardboard can now still be seen.
For part 1 of the spine, cut book cloth measuring 13.4 x 9.7 cm .
For part 2, a piece measuring 16.4 x 11.2 cm . Glue the cut pieces of linen and glue them at a distance of 3 mm from the edge of the already wrapped gray cardboard so that the previously folded edges disappear underneath.
On the unfolded edge, which is 6 cm longer, the bookcloth for lining should end flush with the bookcloth underneath. If it doesn't fit completely, you can use the cutter and the set square to cut off the linen a little to get a clean edge again.
Again, smooth everything out.


Step 5: Attach the ring binder mechanism to the spine
Now place the bound parts of the spine flush on one side along the outer edge.
Make sure that the book cloth that still protrudes is facing outwards on both sides and that the inside of the smaller spine is on the outside of the larger spine.

Now place the ring binder mechanism in the middle of the smaller back piece. Mark the position of the holes for the rivets with the pencil. You can now use a screw punch to punch holes in the bound gray cardboard at the marked points.


Tip: To punch out the holes, place a separate solid surface under the covered gray cardboard, as the screw punch punches through the gray cardboard when used and can leave unsightly holes in the surface. We recommend using a small wooden board as a base.
Place the holed back piece back on the other back piece as described above and mark the position of the holes for the second back piece through the punched holes.
Punch holes in the bound gray cardboard here too.


Now you can use the ring binder mechanism. To do this, push the bottom part of the rivets first through the holes in the smaller back piece, then through those in the larger one. Insert the mechanism on the inside of the larger back piece and clamp it in place with the rivet head.
To ensure that the ring mechanism remains properly attached, you must now take a riveting tool . Place a small piece of felt on the rivet head. Place the base of the tool on the back of the rivet, also with some felt in between. Place the small rod on the rivet head covered with felt and hit it with the hammer until the rivet is tight. Repeat with the second rivet.
Your ring binder mechanism should now firmly connect both back parts.


Info: Our ring binder mechanisms are coated with colors that match our collections. This is why it can happen that the paint layer chips off when pressure is applied. The felt is intended to prevent the coating from chipping.
Step 6: Finish the book
Using the excess bookcloth, glue the spine pieces in the middle of the cover and bottom pieces, on the side where the gray cardboard can still be seen. Make sure that the gray cardboard edge of the back pieces is not directly flush with the cardboard edges of the lid and base. Keep a distance of approx. 2mm here so that the book can be closed easily. After gluing, press everything smooth and firmly. When gluing, pay attention to the same colors of the linen.


Now cut more book linen for the inside of the cover and base to cover the gray cardboard. For the cover, cut bookcloth measuring 19.4 x 20.4 cm .
For the base, a piece measuring 19.4 x 20.7 cm . Glue the cut linen and glue it at a distance of 3 mm from the edge of the already wrapped gray cardboard so that the folded edges and the connecting linen of the back pieces disappear underneath.


Finally, weigh the book down and let it dry completely.
Congratulations, your own double spine book is ready. You can now fill and decorate this as you wish.


We hope you enjoy crafting!
From us for you ⭐
Janine


The instructions are subject to alexandraRenke's Angel Policy.
This can be found at www.alexandra-renke.com.
Alexandra Renke
51503 Rösrath, Germany
© alexandra-renke.com
All rights reserved.
All rights reserved.
1 comment
Eine tolle Idee, da kommen die Mechaniken richtig toll zur Geltung! Danke für die schöne Anleitung ❤️