material
- (2x) design paper of your choice
- (1x) sheet of home collection or design paper
- (1x) book linen
- (1x) creative block
- (1x) Bundle of gray cardboard with a heart cutout
- Elastic band and eyelets of your choice
Tools
- Book glue
- Brush for gluing
- Set square with metal cutting edge (alternatively: set square and metal ruler )
- Sharp cutter
- Small metal ruler
- tweezers
- Tool for setting the eyelets
- If necessary , Crop-A-Dile
- Pencil
- Container for diluting book glue (e.g. jam jar)
- Scrap paper
- Cutting and folding board
- Bone folder (ideally made of Teflon)
- Cutting/crafting mat
- Dry rag
- Damp cloth or oil-free baby wipes
- Liquid glue
- A very sharp, precise pair of scissors (I recommend the sewing scissors from Fiskars , they are perfect)
- If necessary, use non-stick scissors
Cuttings
Screen printed or gray cardboard, 2 mm thick
(1x) 16 x 16 cm (included in the set)
(1x) 16 x 1.5 cm (cut from the second large cardboard piece from the set)
Screen printed or gray cardboard, 1 mm thick
(1x) 16 x 16 cm (included in the set)
(1x) 16 x 16 cm with heart cutout (included in the set)
Design paper
(1x) 15.5 x 15.5 cm (inside of the coat, flap)
(1x) 15.3 cm (height!) x 17.7 cm
A piece of design paper with a motif of your choice for the heart cutout
book linen
(1x) 19 x 38 cm (cover of book cover outside)
(1x) 15.5 x 5 cm (book spine inside)
General tips
Cutting the cardboard
It's better not to use a guillotine to cut, as the strips will quickly become a little crooked. I like to use a large cutter with a chipping blade (always a fresh blade) or, even better, a real box cutter with trapezoidal blades. Ideal for this: a metal ruler or set square with a metal edge. Score along the desired cut edge, preferably more often with a little less pressure than two or three times with strong pressure. Particularly easy: You can “score” with your cutting board, but the blade quickly becomes dull. I like to use old blades for this that no longer cut the paper completely smoothly.
Material selection
You can also use new cardstock instead of bookcloth (for example bubble or silk).
Gluing
Gluing is always done from the inside out. If the entire cut piece has to be glued in right up to the edge, then place scratch paper under it and use the brush to move it over the edge. Remove the scratch paper immediately and make sure that no glue ends up on the “nice side” of the linen or paper.
It is important, especially when you are using curves or windows: the glue does not belong on the cardboard, but on the linen or paper. This can also be done quite generously, because the material should swell and be able to stretch a little so that it fits well around the curves and edges. If you allow the material to swell well, you can also easily cover curves with design paper.
For this project you need to dilute the glue with approx. 10% water.
Cut all the material once ( Fig. 1 ), then you can start with the first step:

Step 1
The book cover with the heart cutout
Place the linen in front of you with the nice side down. If you don't have much practice yet, draw a thin guide line with a pencil at 1.5 cm on the bottom and left edge. Glue the linen at a distance of 1 cm from the edge, initially only the first 17-18 cm. Glue the cardboard part with the heart cutout straight on, as shown in Fig. 2 , and smooth the linen.

Now cut out the heart and leave a margin of around 0.7-10 mm . Using very precise scissors, begin the cuts. Attention: DO NOT cut all the way to the edge! The cardboard is 1 mm thick, so you need to keep a little more than 1 mm away from the edge. Start on the heart at the point where the arches come together and cut spikes as shown in Figure 3 .
In the picture you can see that the first prong extends the tip, so to speak. This prong should be very fine. Cut wedges up to the point where the arches would “intended” to continue and insert a fine point here too. Then you only have to make cuts a little more than 1 mm from the edge along the curves: the cleaner and finer you work here, the better your result will be. You don't make any incisions on the straight legs of the heart, but leave a connected flap. When you have reached the top of the heart, cut very fine spikes again as shown in Fig. 4 .


Glue the prongs and also the edge of the cardboard neatly ( Fig. 5 ), making sure that no glue gets on the front. Let the linen swell a little.
Take your Teflon folder and trace the edges of the heart on the front without applying much pressure, just so that the swollen linen bends around the edge (Fig. 6 ).


Place your cut in front of you again with the nice side down and pull the spike at the tip ( Fig. 7 ) up and glue it in place. Make sure that the prong does not break off. You also pull the other two prongs over the edge and glue them in place so that the excess is neatly lined with book linen ( Fig. 8). Pull the two tabs over the edge with your thumb and press them onto the cardboard ( Fig. 9).


Now do the same with the incisions in the arches of the heart.
It should now look like Figure 10 from behind. In Fig. 11 you can see what the cutout should look like from the front.


Step 2
The motif behind the heart window
Spread the glue up to the edge, but not beyond ( Fig. 12 ): No glue should land on the area that will be visible later. Now stick your motif on with the nice side on the glue ( Fig. 13).


As shown in Fig. 14 . and Fig. 15 it should now look like it from the front.


Step 3
book cover
Glue the spine of the book at a distance of 5 mm and the cardboard cutout with a thickness of 2 mm at a further 5 mm distance. Then glue the last 1 mm thick cardboard blank and glue it to your cardboard part with the heart cutout ( Fig. 17 ). Make sure that all corners and edges line up neatly.
In Fig. 18 you can see what it should look like.


Now cut off all corners and leave a 3 mm gap to the tip of the cardboard (one and a half times the material thickness) as shown in Fig. 19 . Glue the long edge and use your bone folder to fold the linen around the edge ( Fig. 20 ). Trace the grooves next to the spine of the book with the bone folder and press the flap neatly into place ( Fig. 21 ).


Your corners are now still open as shown in Fig. 22 . Press this down with the bone folder (Fig. 23 ). Do the same with the other corner. These should then look like in Fig. 24 .


Fold over the opposite tab, work out the corners neatly here too, then coat the short tabs with glue and fold them around the edge.
In Fig. 25 you can see what it should now look like.

Now glue the small strip of linen over the edges and glue it to the inside of the book spine. I like to start in the middle ( Fig. 26 ) and then push the line into the groove and further tighten it ( Fig. 27).


Step 4
Pocket for the back cardboard
Now comes the “bag” into which you will later hang the cardboard backing of the creative block.
Place the large paper blank with the long edge on your folding and cutting board and fold at 1 cm on the left and right. ( Fig. 28). Turn the nice side down, fold up the tabs and spread a little liquid glue on them ( Fig. 29 ).


Glue around the cut from the house collection as shown in Fig. 30 , so that the bottom is flush. There is now a small piece sticking out at the top (Fig. 31 ).


Now glue the back completely up to the edges and glue it to the inside of the part WITHOUT the heart cutout ( Fig. 32 ). The small overhang is at the top ( Fig. 33) .


Glue the last piece of design paper to the free area (inside of the part with the heart cutout).
Now leave the cover lying flat and weighted down to dry, preferably overnight.

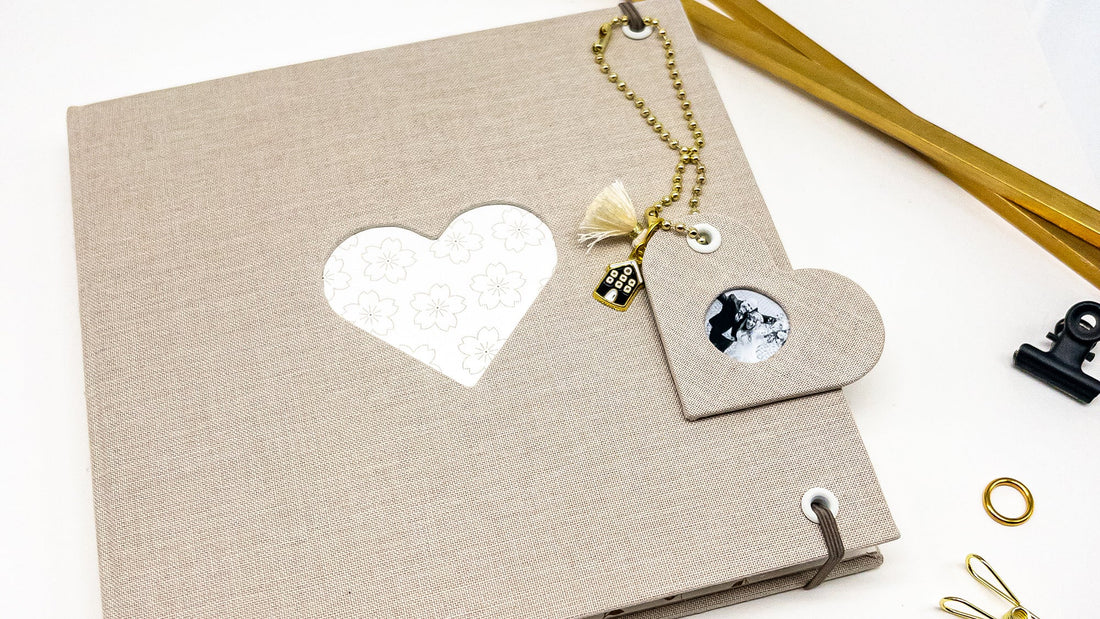
You've probably noticed that the gray cardboard set also includes a small cardboard heart. I made a pendant out of it, it just doesn't work without some stuff :)
Now I'll show you how I did it. If, like me, you want to insert a window, you will need a second heart made of cardboard. You can cut this out yourself from 1 mm cardboard or you can get another cut.
Step 5
Heart pendant
For this you need:
- The cardboard heart, twice
- A piece of book linen , at least 1 cm larger than the heart
- A piece of bookcloth in the shape of a heart, but cut a little smaller than the cardboard heart
- Plenty of tüdel stuff ( eyelets , beads, charms , etc.)
- A photo of your choice

I punched a small section into one of the hearts for my photo. Glue the linen and glue the heart with the cutout onto it ( Fig. 36 ).

Cut a hole as shown in Fig. 37 and make incisions of just over 1 mm in the bookcloth overhang (you already know this from the curves of the heart). Glue the excess and the edge of the cardboard and use the bone folder to place everything around the edge without applying much pressure ( Fig. 38 ).


Glue the entire back of the heart and cut your photo to the desired size (Fig. 39). Apply glue here again ( Fig. 40 ) and stick the second cardboard heart on top, making sure that everything is flush ( Fig. 41 ).


Cut prongs into the excess linen as shown, but keep a little more than 2 mm away from the cardboard. Glue these in and place them around the edges using the bone folder ( Fig. 42 ). Once you have glued everything neatly on the back, glue the linen heart onto the back (I used one of the cardboard hearts as a template and cut off about 2 mm of the edge) ( Fig. 43)


Complete! I added another eyelet (the Fiskars eyelet tool is perfect for our eyelets) ( Fig. 45 ) and you can see the finished result in Fig. 46 :)


When your book cover is dry, you can thread the creative block ( Fig. 47 ) and you're done!

I added a closure made of an elastic band and 2 eyelets.
The trailer can be easily hung here ( Fig. 48 ).

Have fun working!
From us for you ⭐
Silke
If you would like to see more of Silke's work, follow her on Instagram at @ silke.rossmueller , or stop by one of her workshops, you can find all the information here .
4 comments
Wer anstatt des Buchleinens unser neues Cardstock verwenden möchte, muss in dem Fall die Vorder- und Rückseite des Buchs einzeln beziehen und dann zum Verbinden ein kleineres Stück Buchleinen und/oder Kraftpapier verwenden.
Dieses Verfahren wird in unserem Blogbeitrag “Anleitung: Buchbinden” genau erklärt :)
Liebe Silke, die Anleitung ist wunderschön. Ich würde es gerne versuchen. Habe aber gleich mal eine Frage. In der Beschreibung steht:
Zuschnitt Buchleinen :(1x) 19 × 38 cm (Bezug Buchdecke außen). Weiter unten steht dann, dass man statt Buchleinen auch den neuen Cardstock Bubble verwenden kann. Dieser ist jedoch nur 30,5 cm groß. Wie funktioniert das dann? Oder habe ich was missverstanden?
Danke und liebe Grüße
Heike
Das ist mal wieder großes Kino!
Ich freue mich sehr auf´s Nachbasteln.
Liebe Silke, tausend Dank für Deine Mühe und allen Engeln für die schönen Inspirationen zu dieser Anleitung.
Ihr seid super <3
Das ist ja superschön! Vielen lieben Dank für die tolle Inspiration und die ausführliche Anleitung! Ich freue mich sehr aufs Nachbasteln!